
microTracker Documentation
0: What is microTracker?
Music trackers were a common way in the 1980s and 90s of scoring music for computer games. Rather than just storing a timed stream of musical information (such as that sent over MIDI), trackers organised music into patterns that could be ordered and repeated, thus reducing the overall memory used for the music (which was at a premium in the computers of the day.)
microTracker is a music tracker built into microM8 that allows for the creation of similar music, initially for the 6-channel Mockingboard sound card on the Apple II, which microM8 supports. Music composed with microTracker can be played back inside the emulator (or on real hardware) using a companion IRQ-based playback engine, which is provided when a song is exported, or can be compiled from the source available from the Paleotronic website.
microTracker and its playback engine can also be used to create sound effects and fanfares that can be triggered during games. The engine will sit in the background, and will wait until called upon, at which point it will play back an effect and then go back to waiting. Inside microM8, you can also use microTracker songs with microBASIC and with microPAK files.
1: Tracker basics
You open microTracker by selecting it in the Tools sub-menu inside of the microM8 ‘Disk’ menu, which will appear if you move the mouse toward the top-left corner of the microM8 window and click on the green floppy disk icon.
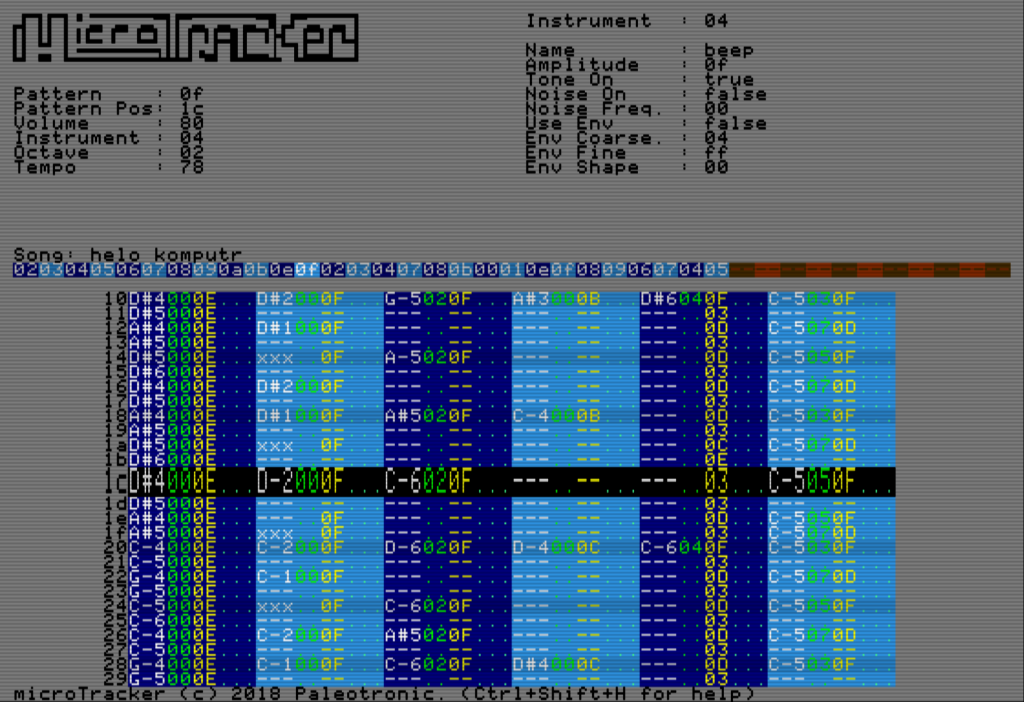
The tracker is arranged into 4 main areas: The pattern viewer / editor, at the bottom; the instrument view / editor at the top-right; the state pane at the top left; and the song arrangement in the vertical centre. You can move from one area to the other (excluding the state pane, which is not editable) using the Tab key.
1-A: The musical keyboard
When the cursor is in the pattern viewer / editor, notes are entered using the computer keyboard, with the first two rows corresponding to the upper musical scale, and the second two rows corresponding to the lower scale. Thus, these keys:
2 3 5 6 7 9 0 =
Q W E R T Y U I O P [ ]
play / enter these notes:
C#D# F#G#A# C#D# F#
C D E F G A B C D E F G
and these keys:
S D G H J L ;
Z X C V B N M , . /
play / enter these notes:
C#D# F#G#A# C#D#
C D E F G A B C D E
one octave lower. To change the ‘root’ octave of the keyboard, you can press shift-up and shift-down while the cursor is inside the pattern editor. The current octave is indicated in the state pane in the upper-left.
1-B: The pattern structure
The music pattern (displayed in the editor in the lower half of the screen) is made up of six columns, corresponding to each of the six voices provided by the emulated Mockingboard’s two AY-3-8910 synthesiser chips. Each of these columns contains 64 rows, and each row can correspond to a single note, a single instrument, a single volume and a single command.
For example:
C-4010EF80
In the example, the first three characters identify a note and octave (the note C and the octave 4), the next two characters identify the instrument used to play the note (01), the following two specify the volume of the sound played (0E) and the final three specify a command (in this case, F80 – F is the command and 80 is the value applied to it).
While notes must include an instrument, the volume and command fields are optional. Also, a note / instrument is not required to enter a volume or a command, either or both of these may be used in isolation, for example to manually fade out a note.
Like most trackers, all numeric values in microTracker are in hexadecimal – that is, hexadecimal 10 = decimal 16. Decimal numbers 10 through 15 are represented by the letters A through F. Hence 31 in hexadecimal is 1F. There is a column of numbers down the left side of the pattern to note which row is which – these numbers are in hexadecimal format, with 3F at the bottom indicating the 64th and last row of the pattern.
While the cursor is active in the pattern area (if it isn’t, you can switch to it using the tab key) you can move around it using the cursor keys. The backslash (\) key switches between entry and ‘read-only’ mode, the latter useful for testing out sounds or working on melodies without writing anything to the pattern.
1-C: Instrument creation
Instruments store configurations of the Mockingboard’s synthesiser chips which are then applied when a specified note is played by the tracker. Each song can have up to 256 instruments, numbered 00-FF.
The current instrument is displayed in the instrument pane, in the top-right corner of the screen. The number of this instrument is automatically inserted when you enter a note into the pattern, and this is the instrument that will subsequently play.
Each instrument has an editable name, and 8 other editable values: amplitude (or volume, a value from 00-0F), a toggle to turn on or off the voice’s tone generator, a toggle to turn on or off the noise channel (each bank of three voices share a single noise channel), the frequency of the noise channel (00-1F), a toggle to enable or disable the volume envelope (each bank of three voices shares a single volume envelope) and finally the three values for the envelope: its ‘coarse’ frequency value (00-FF), its ‘fine’ frequency value (00-FF) and its shape (00-0F).
The envelope can have one of 65,536 frequencies, programmed using the coarse and the fine controls. The coarse value is multiplied by 256, and then the fine value is added to the result. So a coarse value of 8 and a fine value of 7 would result in (8*256)+7 or 2055.
There are eight unique envelope shapes numbered thusly (from 0 to F):
\____________________________ 0,1,2,3,9
/|___________________________ 4,5,6,7,F
\|\|\|\|\|\|\|\|\|\|\|\|\|\|\ 8
\/\/\/\/\/\/\/\/\/\/\/\/\/\/\ A
___________________________
\| B
/|/|/|/|/|/|/|/|/|/|/|/|/|/|/ C
____________________________
/ D
/\/\/\/\/\/\/\/\/\/\/\/\/\/\/ E
The volume of the tone and / or noise generators are affected by the envelope at the rate specified by the coarse and fine frequency values. Experiment with changing these parameters to see their effects.
However, be aware that the left three channels and the right three channels each share one of two envelope generators – if you use two instruments with different envelopes in the same bank at the same time, the one furthest to the right in the pattern will apply to both instruments! This limitation is not all bad – it can be leveraged to create some interesting effects.
There is also only one noise generator for each of the two banks – similarly, if two instruments attempt to set the noise frequency, only one will win. Such are the limitations of two 40-year old chips!
You can move through the instruments by holding the shift key and pressing the left arrow or the right arrow. This works in both the pattern editor and the instrument editor / pane. microTracker sets 16 default instruments upon opening; you can play with these to see how the various instrument parameters affect the sound.
To edit the instruments, press the Tab key until the blinking cursor is in the Instrument pane. Then you can use the up and down cursor keys to move through the parameters, and change them using the left and right cursor keys.
The instruments are collectively saved and loaded with the song data, or can be saved and loaded individually by using control-shift-S and control-shift-L accordingly while the cursor is in the instrument pane.
1-D: Song arrangement and title
The song title and song order are displayed in the vertical centre of the screen. You can tab to it, and then use the left and right arrow keys to move
through the order. The up and down arrow keys set the pattern number (from 00 to FF). By setting the pattern numbers in each slot of the song order you specify the order the patterns will play in. The song order and the pattern number otherwise have no direct relationship; you can have a song order of:
09 03 0a 13 02 09 11
and when the song plays, it will start with pattern 09, then move on to pattern 03, then 0a and so forth. You can repeat patterns and reuse patterns as much as you like:
00 00 00 01 02 01 02 00 02 etc.
You can change the name of the song by pressing shift-up arrow while the cursor is in the song order.
1-E: Loading and saving a song
Press Control-Shift-L to load a song. You will need to know its name. Otherwise, you can use the microM8 file catalog to open a song (however you cannot enter the catalog from inside microTracker; you must exit it first using the Escape key. But don’t forget to save (Control-Shift-S) first if you need to!
There are a number of example songs in the directory /media/sng/ – go there using the file catalog and select a song. Press Enter to start playing the song. Note how the song patterns are arranged, and the music that translates to. The best way to learn how the tracker works is to watch it play pre-scored songs – this is why we’ve provided them.
1-F: Step and real-time entry
So, by now you know how to enter notes, create and edit instruments, and set the song order. Let’s get to writing some music! Press Tab until the blinking cursor is inside the pattern editor. Use the cursor keys to navigate to the top-left of the pattern, if the cursor is not already there.
There are two methods of entering notes into the pattern. The first is called ‘step-entry’ – you enter the notes one at a time, and their length is determined by the amount of space you put between them. So, for example, with the cursor at the far left of the row, press the Q key. Assuming the keyboard is not set ‘read-only’ (if it is, it will say so in the State pane; press \ to switch it to write mode) you will end up with something like:
C-4000F…
In this example, we’ve entered the note C, octave 4, instrument 00 at volume 0F and with no command.
A note should also play. If it doesn’t have an envelope, it may keep playing; press the space bar twice in quick succession to stop it.
To enter another note, use the cursor keys to move down to the desired position. What that position is will depend on how fast the song is played back (its tempo is set with the F command; see below.) Enter the wrong note? Use the backspace key to get rid of it (this also works with volume and commands!)
To use a different instrument, use shift-left arrow and shift-right arrow. You can also edit a note’s instrument by moving the cursor over it and typing in a new value. This also applies to the volume and the command but not the octave (you must retype the note using the musical keyboard).
You can also enter volume values on rows that don’t have notes – this allows you to taper off a note, or create volume-based effects. However, if you enter a volume after a note with an envelope plays, the ENVELOPE WILL SWITCH OFF and the voice will play at the volume specified.
Play back the pattern in a loop using control-space. Do it often so you can hear how the pattern sounds, and make changes accordingly. You can also enter notes while the pattern is looping (real-time entry)! It’s probably best to create a percussion track if you want to enter music this way, so that you can hear the beat and play the notes at the right time.
If you start loop playback with control-space and you want to stop, you need to press control-space again – if you press space, playback will continue and go on to the next pattern as normal.
You can start playing the song back from the top of the current pattern using shift-space. This will continue on to the next pattern rather than looping. You can also step through playback one line at a time using the Return key.
The xxx note:
Finally, there is a special note, called the xxx note. This ‘note’ ‘kills’ the instrument and causes it to stop playing – this is handy for instruments that do not have an envelope and will just keep playing forever (which you may not want). You enter the xxx note using the ` key. It looks like xxx..–…
1-G: Additional keyboard commands
All editing is not completely manual in microTracker. You can cut, copy, paste and delete just like in other applications.
Control-X – cut track Control-Shift-X – cut pattern
Control-C – copy track Control-Shift-C – copy pattern
Control-V – paste track Control-Shift-V – paste pattern
Control-D – delete track Control-Shift-D – delete pattern
Copy, cut, paste and delete patterns also works inside the song order pane.
If you make a mistake, you can use Control-Shift-Z to restore the pattern to the state it was before you did your last copy/cut/paste/delete. But this is only a single-level ‘undo’ so pay attention!
Control-Shift-N prompts to erase everything and start a new song. There’s no going back from that!
Control-1 through 6 disable / enable tracks, so you can hear tracks in isolation.
2: Tracker commands
Commands are triggered using the letters A-Z in the first character of the three character command field. All of the current commands work with the Apple II machine language player.
A: Unused: currently does nothing.
D,G,H,I,K,L,M and O are also currently unused.
B: Jump to song order xx
Bxx jumps to song order xx, eg B00 would restart the song (although this happens automatically once the tracker plays the last pattern in the song order).
C: Adjust volume (relative)
CXX adjusts the volume of the currently playing note. The first digit increases it by X, the second digit decreases it by X. For example, C10 would increase the note volume from 5 to 6, while C02 would decrease it from 5 to 3.
E: Toggle envelope
E00 turns the envelope off; E01 toggles it on.
F: Speed (BPM)
FXX sets the speed of playback. This is in beats per minute (a ‘beat’ is four rows, indicated by the darker lines). This value is in hex, so to set 128BPM would be F80.
J: Jump to next pattern in song order at line XX
JXX advances to the next pattern in the song order and if XX is non-zero,
starts playback at the specified line. For example, J04
N: Adjust noise period
NXX sets the noise ‘period’ or frequency to XX, a value from 00 (high) to 1F (low). For example, N10
P: Pauses playback
In the tracker, P01 or P02 will pause playback. However, in the machine language player, P01 will cause the player to stop executing, while P02 will cause it to pause and await further instruction (see section 3).
Q: ‘Roll’ the envelope period (frequency) parameters
Using Y and Z you can adjust the coarse and fine envelope period parameters, but not both at the same time. Q01 allows you to transition over the threshold from X coarse and FF fine to X+1 coarse and 00 fine, while Q10 moves from X coarse and 0 fine to X-1 coarse and FF fine.
R: ‘Roll’ the tone period (frequency) parameters
Using T and U you can adjust the coarse and fine tone frequency parameters, but not both at the same time. R01 allows you to transition over the threshold from X coarse and FF fine to X+1 coarse and 00 fine, while R10 moves from X coarse and 0 fine to X-1 coarse and FF fine.
S: Select tone or noise (or neither)
S00 sets both off, S10 turns only tone on, S01 turns only noise on and S11 turns both tone and noise on in the channel the command is used.
T: Adjust tone period (frequency) coarse (relative)
The T command decrements or increments the current coarse tone value by the amount specified. For example, T10 decreases the coarse value by one (lowering the overall pitch) while T01 increases it by one (raising the overall pitch).
U: Adjust tone period (frequency) fine (relative)
The U command decrements or increments the current fine tone value by the amount specified. For example, U10 decreases the fine value by one (lowering the pitch) while U01 increases it by one (raising the pitch). This command does not ‘roll’ – when it hits 00 it stays at 00 even if you issue a U10 command, and when it hits FF it stays at FF even if you issue a U01 command. You can use the R command to ‘roll’ to the next highest or lowest coarse tone period and move the fine tone period to the appropriate top or bottom of the range.
V: Set envelope number
Vxx sets the envelope number where xx is a value from 00 to 0F. See section 1C for a description of the envelopes.
W: Set envelope period coarse (absolute)
Wxx sets the absolute value of the coarse envelope register, where xx is a value from 00 to FF. This change applies immediately, the envelope generator is reset, and so long envelopes may be cut off if you use this command.
X: Set envelope period fine (absolute)
Xyy sets the absolute value of the fine envelope register, where yy is a value from 00 to FF. This change applies immediately, the envelope generator is reset and long envelopes may be cut off.
Y: Set envelope period coarse (relative)
The Y command decrements or increments the current coarse envelope period value by the amount specified. For example, Y10 decreases the current coarse value by one, while Y01 increases it by one. The change applies after the current envelope cycle completes.
Z: Set envelope period fine (relative)
The Z command decrements or increments the current fine envelope period value by the amount specified. For example, Z10 decreases the current fine value by one, while Z01 increases it by one. The change applies after the current envelope cycle completes.
3: Exporting: the assembly language player
microTracker has a companion machine language player program that allows you to play your microTracker compositions back on a real or emulated Apple II+ or //e system with a Mockingboard sound card. microM8 can automatically compile this player along with your song using the Control-Shift-E (export) function inside microTracker. You can specify the address at which the player and song data are loaded.
3-A: Compile your own player
If you are a more advanced programmer and you would like to customise and compile the player and song data yourself (allowing you to arrange it in memory as you require), you can use the Control-Shift-A key combination to write an assembly listing of the song data, which can be used with the player assembly listing available on GitHub.
3-B: Note on song speed changes
IMPORTANT NOTE: Because the song player uses IRQ timings for playback and these are assigned ahead, the Fxx song speed command doesn’t take immediate effect, instead taking effect after the following IRQ timing period has concluded. This may lead to undesirable behaviour in songs that have in-line speed changes.
You can mitigate these by including an Fxx command with an intermediate value roughly half-way between the current speed value and the desired speed value (because two IRQ cycles occur for each line of playback) on the line previous to the Fxx command with the target speed value (usually on the last line of the previous pattern in the pattern order.)
However, this will affect song playback in microTracker adversely, so only do this before you export the song.
3-C: Player control vectors
You can start, pause/unpause, or stop the player using the following vectors (ORG is usually the LOADADDR):
JMP StartMusic ; ORG + 0
JMP KillMusic ; ORG + 3
JMP TogglePause ; ORG + 6
JMP JukeBoxStart ; ORG + 9
JMP JukeBoxPlay ; ORG + 12
See the next section for more information on the JukeBox vectors.
3-D: Jukebox mode
The machine language player will happily play through a single composition when CALLed or BRUNned to execute normally at its load address, but you can also use the player to play back fanfares and sound effects without reloading it each time.
Simply construct your song file to contain the sound effects and fanfares you desire, each on its own pattern, and with each pattern in the song order.
At the end of each SFX or fanfare, place the P02 command (which causes the player to pause.)
Compile the song, load it into the Apple II’s memory and CALL JukeBoxStart (LOADADDR+9). Then POKE the song index of the pattern you want to play into JBPatternIndex (LOADADDR+15) and then CALL JukeBoxPlay (LOADADDR+12).
For example (from the SFX program on mtrkdemo.dsk):
10 PRINT CHR$ (4);”BLOAD SFX” : REM LOADADDR is 16384 (default)
11 HOME : PRINT “Demo of playing individual song”: PRINT “patterns for fanfare and sfx purposes:”: PRINT
20 CALL 16393 : REM JukeBoxStart (LOADADDR+9)
21 PRINT “1 – GAMBLING”: PRINT “2 – GOOD NEWS”: PRINT “3 – DIRGE”
22 PRINT “4 – LAUNCH”: PRINT “5 – BOMB”: PRINT “6 – EXPLOSION”
23 PRINT “7 – PEW!”: PRINT “8 – ALIENS”: PRINT “9 – BLACK MIRROR”: PRINT : PRINT “0 – EXIT”
30 INPUT A
35 IF Z = 1 THEN CALL 16390
36 Z = 1
40 A = A – 1
50 IF A < 0 AND Z = 1 THEN CALL 16387: END
55 IF A < 0 THEN END
60 POKE 16399,A : REM JBPatternIndex (LOADADDR+15)
70 CALL 16396 : REM JukeBoxPlay (LOADADDR+12)
80 PRINT : GOTO 21
4: microBASIC and microPAK files
microTracker files can also be played back in microBASIC or used in microPAK files.
4-A: microBASIC
In microBASIC the following “at” commands can be used to control the music player:
@music.play{“/path/to/song.sng”} : REM Starts song playback
@music.pause{} : REM Pauses / unpauses song playback
@music.resume{} : REM Resumes song playback if paused
@music.stop{} : REM Stops song playback entirely
@music.pattern{##} : REM Plays from specified song order ##
: (useful for sound effects)
You can also open a song in microTracker using
@music.edit{“/path/to/song.sng”}
You can also use exported instruments and play notes inside microBASIC directly:
@music.instrument{“/path/to/instrument.snd”}
Loads an instrument into the current channel
@music.notes{“L1A3Bb3L4C4L1Bb3B3L4E4”}
Plays back notes in the current channel using the following syntax:
Lx – Specifies the length of the following note(s). Higher is longer.
Ab3 – Specifies the note and the octave, for example C2 or D#5
Rx – “Rests” (plays nothing) for the length of x (same as L)
X – Stops note playback (generally used in combination with Rx, eg XR3)
O – Causes the song to loop indefinitely.
P – Causes the player not to start immediately (Pause)
U – Causes the player to start (Unpause)
So for example @music.notes{“L1CD#EL3FGbA”} will play the notes C, D# and E in succession with the length of 1 (an eighth note) and then the notes F Gb and A with a length of 3 (a quarter note)
L values:
L0: Sixteenth note (1 step)
L1: Eighth note (2 steps)
L2: Dotted Eighth note (3 steps)
L3: Quarter note (4 steps)
L4: Dotted Quarter note (6 steps)
L5: Half note (8 steps)
L6: Dotted Half note (12 steps)
L7: Whole note (16 steps)
L8: Dotted Whole note (24 steps)
L9: Double Whole note (32 steps)
@music.chanselect{#}
Selects a channel (from 1 to 6)
@music.speed{###}
Sets the speed of playback in beats per minute, eg @music.speed{120}
One beat is one quarter note, eg L4
For example: @music.play{“/media/sng/dungeon.sng”} will load and play the Dungeon demo song.
In theory you could use @music.notes, @music.instrument and @music.chanselect to play a multi-timbral song but I wouldn’t. Just use microTracker!
Notes: The first track added to a song determines its length, so ensure you add the longest melody first. Melodies added to additional tracks will be truncated if their length is longer.
Adding O to the end of the first melody programmed will cause the song player to loop indefinitely after the end of that melody is reached. Otherwise, playback will stop at that point and the melody / song will be erased.
While the song is playing, you can place notes on additional tracks by using the @music.chanselect{#} function to switch to a different track, and then using @music.notes{…} again.
If you use @music.notes on a track that has already had notes added to it, those notes will be replaced by the new ones, and this will be immediately reflected in playback.
Once the music stops (either because there is no loop and the end has been reached or you invoke @music.stop{}) the song is erased. However you can use @music.pause{} and @music.resume{} to pause the song, make changes, and then continue playback.
You can also use the P (pause) ‘note’ at the start of the @music.notes string to prevent the song player from beginning playback once notes are added. Once you have added all of the notes to the various tracks you require, conclude the last entry with a U. This will cause playback to begin.
4-B: microPAKs
To use a song file in a microPAK, simply specify it in the source field of the audio.cfg file inside the .pak
For example:
init
mockingboard
psg0balance
-0.5
psg1balance
0.5
speaker
volume
0.5
music
source
/media/sng/dungeon.sng
leadin
0
fadein
0
You can also change the balance of the Mockingboard stereo output in this file.
5: Example songs / disk
Example songs are available in /media/sng/ via the microM8 file catalog.
You can download an example disk from http://paleotronic.com/wp-content/uploads/2019/01/mtrkdemo.zip
It features several songs and an SFX (Jukebox) demonstration.
Thanks for using microTracker and microM8! Any questions? E-mail
help@paleotronic.com